Thursday, October 30, 2008

Eye Popping Treats: Delciously Gross!

As all meat eaters know, the eyes are always the best part; they're squishy yet crunchy at the same time. I wanted to share this recipe with you so you'll know how to prepare your eyeballs once you've scratched them out of your victims.


"Eye"deal Cannibal Cookies
  • 5 1/4 cup confectioners sugar
  • 4 cup peanut butter
  • 1 cup melted butter
  • 6 cup Rice Crispies
  • 1 1/2 lb of white chocolate or 2 12 oz. bags of white chocolate chips
  • 1/2 bar of paraffin wax
  • 1 large bag of M&Ms
  • red food coloring
Mix the sugar and Rice Crispies together in a large bowl and set aside. Mix the peanut butter and melted butter until smooth, then fold into Rice Crispies and sugar. Don't be afraid to use your hands. With this recipe, you're gonna have to get dirty! Roll your peanut butter mixture into 1" balls.


Place your balls on a cookie sheet lined with wax paper and chill in the fridge for about 15 minutes.

Using a double boiler, melt the chocolate and wax. If you don't have a double boiler like me, you can create one by placing a mixing bowl on top of a soup pot. Boil water in the soup pot. The steam will create enough heat to keep your chocolate melted but not enough to burn it.


Double boiler with a mixing bowl in a soup pot with white chocolate and wax.

What does the wax do? The wax gives you the best of both worlds: it makes your chocolate more fluid, which helps when coating your cookies, but when drying it helps the chocolate harden faster. I love eating wax!

Stir the chocolate to help everything melt and mix together. When the chocolate is nice and smooth, begin dipping your nut balls. I like using a skewer, but you can just drop it in with a spoon.


Place your coated ball back on the wax paper tray and put an M&M in the center of the ball to create the pupils. Make sure you place the m&M while the chocolate is still wet. It won't stick well if the chocolate dries.


Place your trays in the refrigerator for 15 minutes to let the chocolate completely harden.


To create the veins, take red food coloring and dilute it with a few drops of water to make it easier to use. Using the end of a skewer or tooth pic, draw on some veins. Asymmetrical ones are best. Have them branch out a lot too, that's always great. If you have areas where the peanut butter is exposed, just paint some red in there to create a nice pulpy blood clot. Done!


You can devour these eyeballs paired with a nice Chianti.

Tuesday, October 28, 2008

Finger Food, Mwa Ha Ha!

I've been cooking up some killer treats for the Death at the Prom aerial extravaganza this weekend. To give you a quick sneak peak, check out some of these finger licking treats.


Inspired by Yeah, That's Vegan's bloody finger cookies, I decided to try making some disembodied digits of my own. I wasn't so into the vegan recipe, so I decided to go with Mexican Aniseed shortbread recipe which would fit our Dia De Los Muertos theme, as well as add some nice liver spots to the fingers. I also substituted almond slices instead of whole almonds as they are WAY cheaper to suit my shoestring budget.

I rolled the cookies on the table top with my hands allowing the dough to seep up into the creases between my fingers making quick knuckle joints. Using a knife, I scored the joints for wrinkle marks and pushed the almond slices into place at the finger tips. A good tip is to make the fingers skinnier then you want them as they plump when you cook 'em.


These things are really tasty and I'm not pulling your finger. Har har.

Mexican Aniseed Shortbread


1 1/2 c. flour
1/2 c. sugar
1 tsp whole aniseed
1 tsp baking powder
1/8 tsp salt
1/2 c. butter
1 tsp whiskey
2 tsps vanilla
Almond slices for finger nails

Bake at 375 degrees for 7 minutes.

Sunday, October 26, 2008

Eat Away the Pain With Cute Bento Lunches


Originally posted by Paulina J. on Cute Overload

Its been kind of depressing lately. Financial Crisis, negative and embarrassing Presidential campaigning, energy crisis, global warming, whats the world coming too? So we need a heavy dose of cute overload to chase the negative pessimistic worries away. Ok, so how about these munching cute Bento lunches? Are we having fun yet? Here's more.


Originally posted by Paulina J. on Cute Overload

OMG! I love the asparagus oar!

Friday, October 24, 2008

Totally Sweet Tips


Jura Whisky Originally uploaded by Bearfaced

This week, one of our photos was included on the city scene blog Totally Sweet in Chicago, in a post supplying great cures to the cold weather blues including fireplaces, soup, tea and best of all, whiskey. As we here at Forkable, love all those things, we suggest you check it out to help turn your blues into a clear reddish gold.

Thursday, October 23, 2008

A Quick Pie Crust


My Grandmother's no-chill pie doughis delicious, easy, and quick because you don't need to chill it for a couple hours before rolling out!

This recipe requires:

2 1/2 c. Flour
1 c. Shortening
1 Tsp. Baking powder
1/2 tsp. Salt
1 egg + 1/2 c. cold water

2763917763_0fe41ac234.jpg

Sift the dry ingredients together. Using a fork or a pastry cutter, mix shortening in until dough is chunky.

Take a liquid measuring cup. Add 1 egg (best if at room temp). Add cold water to egg until mixture measures 1/2 cup.


Use cold water only as it helps bind dough and keep dough solid when handling. Mix Egg and water together with fork.


Using a pastry cutter, mix together pie dough.

Fork water and egg mixture into the dough.

Kneed your dough together. I like to use an old pillow case I reserve only for baking purposes. It helps limit the handling as well as the mess!


Kneed dough in pillow case until a nice dough forms


The pie dough recipe is enough for two pie crusts. Cut dough ball in half to prepare your crust.

Roll out your dough on a floured surface. When your crust is the right size, roll dough around rolling pin and gently transfer dough to pie pan. Pat dough down into contours of pie pan.

2764434696_242540fde3.jpg

Pie Rolling TIP:
Use a piece of parchment paper sprinkled with flour, roll out pie dough. I like rolling on parchment because you can spin it around easy to change your angle and you can lift the edge of the paper to ease your dough onto your rolling pin when you need to move rolled dough into the pan. Parchment paper is not expensive and found at every grocery store. It has many other handy uses in the kitchen so is always good to have around.

Add your pie filling.

If you are making a crust top for your pie, repeat previous step to get your dough rolled out. Using a pastry brush, brush on egg mixture to help top and bottom crusts join.

Once your top and bottom crust are together or if you only need a bottom crust: Cut off any excess pie dough around the edges, leaving about a half an inch for decorative pinching.


Decoratively pinch to finish edges and make your crust very pie-like. Brush remaining egg mixture on pie crust and your pie is ready for oven.

Done!


For your filling you can try this apple pie or this pumpkin pie.

Wednesday, October 22, 2008

Quick Apple Pie


What's a chicken dinner without apple pie? I don't know but the term "un-amurican" comes to mind. So here is the dessert I whipped up while my chicken was in the oven, and baked while we ate dinner. A quick apple pie!

For the dough I used my Grandmother's no chill pie dough recipe, which besides being fast, is also super delicious. Here is an instructable, which shows the recipe and directions.


Click on box to start instructable and then click on steps at top to scroll through each one.

For the filling, I just peeled, cored and sliced about 8 apples. They were on sale at the corner store for $0.75 a lb, so I think all the apples cost me two or three bucks. Here is the recipe for the filling:


  • 6-8 apples peeled, cored and sliced
  • 1/2 -1 cup of sugar
  • 1 Tbs cinnamon
  • 1-2 tsp of rosewater
  • 3 Tbs sliced butter placed on top of filling (not mixed in)
The amount of sugar depends on the sweetness of the apples. My apples were naturally really sweet so I only added 1/2 cup. I love adding rosewater to apple pie because it compliments the apples so nicely yet in a very subtle way.


After a quick hand mixing of the sugar/cinnamon and rosewater into the apple slices, I placed the butter slices on the mixture and covered with the top pie crust layer. I cut a few slits into the pie crust to allow for the pie to breath and brushed with egg yolk.


I baked the pie for 30-45 mintes at 375 degrees or until golden brown. Then its ready to be served; we chose a la mode! A quick dessert with a quick dinner. We were all winners!

Tuesday, October 21, 2008

The Quickest Easiest Roast Chicken Dinner Ever!

Yesterday, I spent all day grocery shopping in the rain and when I got home I was just plain crabby. I know prioritizing time in a busy schedule to prepare quick home cooked meals is what this blog is about, but sometimes its not easy. I always try to have a big dinner on Monday night to create left overs for us to eat for our workday lunches and to have a nice relaxing meal for Ira when he gets home from work. So crabby or not, dinner needed to be made.


How can one get home at 5 and have a roasted chicken dinner on the table by 7? Here's a quick and simple recipe which produces big flavors making any eaters think you spent hours laboring in the kitchen. That's my favorite kitchen equation!

Zingerman's Rustic Chicken aka Chicken Dinner in a Skillet.
  • 1/4 c. oil
  • 3 large onions sliced
  • 2 c. celery sliced
  • 1 1/3 tsp kosher salt
  • 1 tsp minced garlic
  • 1/2 tsp black pepper
  • 1/2 tsp thyme
  • 1/2 tsp red pepper flakes
  • 1/4 c. chopped parsley
  • 1/2 loaf bread, rye is best
  • 1-2 lemons to yield:
  • 2 tsp lemon zest
  • 1/4 c. fresh lemon juice


In a large skillet, saute onions and celery in oil until clear. Onions and celery will create a huge pile which may appear to overflow skillet, but don't worry they'll cook down in 10 minutes or so.

While onions/celery cook, take your chicken and flip it on its breast so its backbone is facing toward you. With a sharp knife, butterfly your chicken. To do this, you remove the back bone and neck out of the chicken by cutting through the ribs and hip bones.


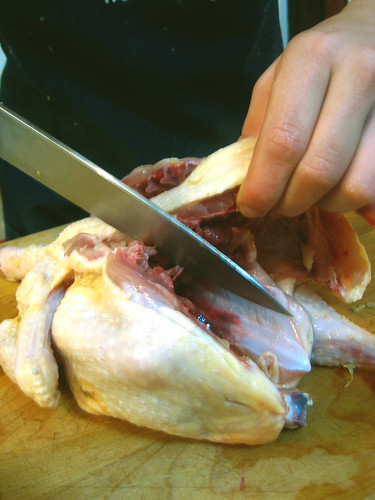
Using sharp knife, cut through bones to remove neck and backbone.

This may sound scary to those new to cooking chicken, but just get in there and do it. Although you have to apply some pressure, the bones cut and break relatively easily. When you have the backbone and neck removed, rub your chicken inside and out with 2 Tbs of olive oil, 1 tsp pepper and 1/2 tsp of salt.


Place seasoned chicken on a plate and set aside.


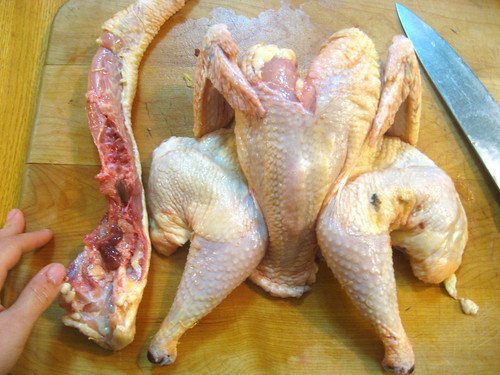
Butterflied chicken with removed neck and backbone.

Tips when cutting your chicken
  • Use a sharp knife and keep your fingers away from the blade when slicing as you have to use some force to cut through the bigger bones.
  • When your backbone has been removed, place chicken on a plate and immediately wash your knife and cutting board with soap water to remove any blood and bacteria.
  • Put your neck in a plastic bag and put in freezer to save for making chicken stock.
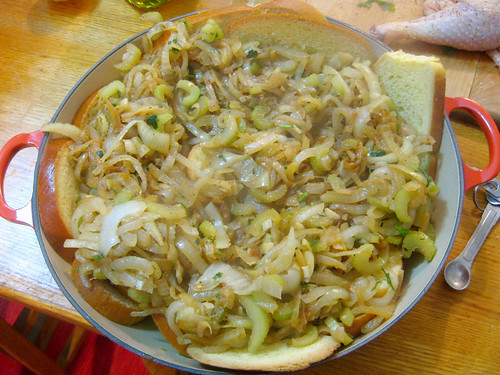
When your onions and celery are clear, add your lemon zest and seasonings.


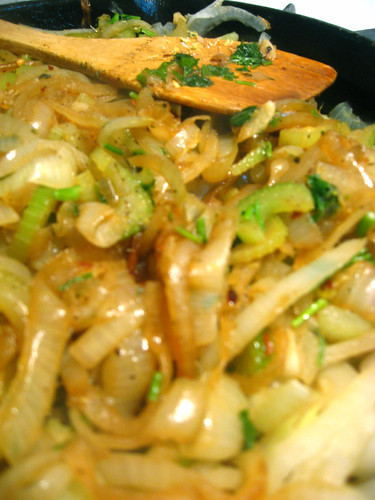
Cooked onions with seasonings.

Stir to mix and remove to a bowl.

In your greasy skillet, layer out the half loaf of bread. This is a great way to use up stale bread!


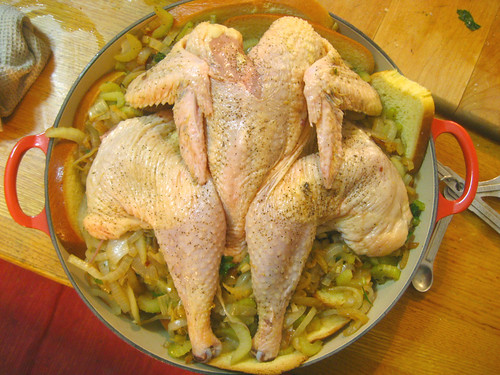
Layer onion mix on top of bread and place seasoned chicken on top of onion mixture skin side up. Pour 1/4 cup of fresh lemon juice over chicken.


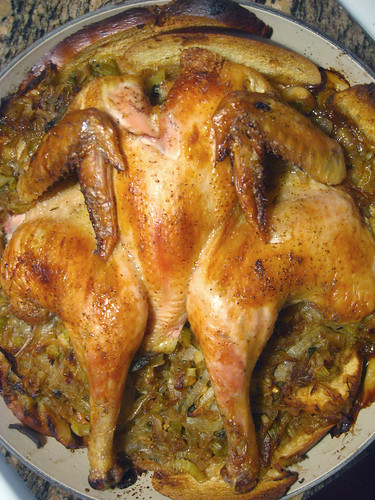
Place chicken in oven uncovered and roast at 375 degrees for 1 1/2 hours or until golden brown. Once done, let sit for 10 minutes before serving.


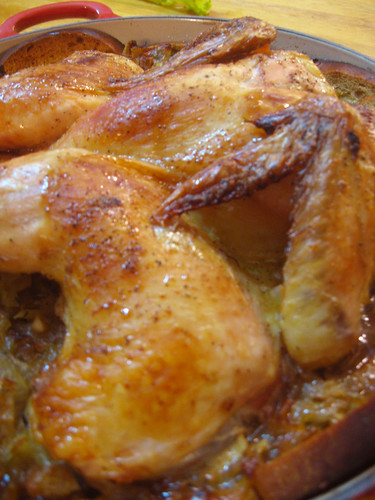
Roasted chicken all golden and crispy.

This recipe, which my Mom gave me from a magazine clipping, is from Zingerman's Delicatessen in Ann Arbor, MI. I love this recipe because of its wonderful simplicity. As the chicken cooks, its juices mix with the lemon and onion seeping down and creating an instant stuffing as the bread gets fried and toasted.


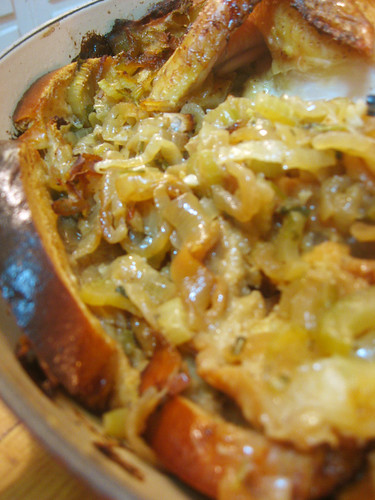
Delicious stuffing of bread, onions, celery and lemon.

The lemon and red pepper gives everything a nice tangy taste to compliment the smooth savory flavor of the caramelized onions. Although we served it with the roasted beet side, you don't have to even make a side if you don't want to. The chicken and stuffing can stand on their own. And clean up is super easy as its only one pan!


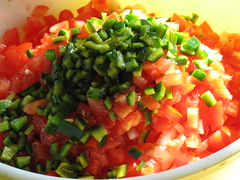
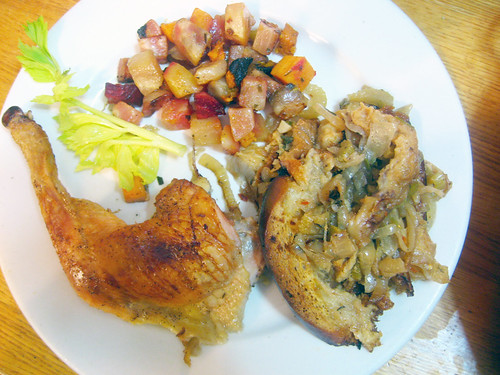
This isn't some pretty bad food photography, but give me a break, I was tired remember??

Ira's mom, Janice, raises about 100 chickens every year and she sent us home with three or four on our last visit. You have never tasted better until you've tried Janice's organic free range chicken! We served the chicken and stuffing with a side of roasted beets from my parents garden. Aren't we lucky? A fully organic meal basically free and grown and prepared with love. (Is that sappy or what. But so true.)

Try this recipe once and you'll be hooked because you can make it in the same pinch you'll give yourself to see if you're dreaming when you eat this delicious dish!

Restaurant Depot: Selling Amazement By The Case


Amber is so amazed by Restaurant Depot that she has to call her Mom
Originally uploaded by chick_pea_pie


Preparing for the Dance of Death food event, I've been compiling my long grocery lists. A friend, who has a membership to the Restaurant Depot offered to take me for my first trip to help me stock up. The Restaurant Depot, an overwhelming warehouse selling bulk foods to members of the food industry, features isle upon isle of 5 gallon buckets of thousand island dressing to cases of 10,000 cocktail umbrellas. My first trip was exciting, yet daunting. My friend, wisely ushered me through the stacks, to select all my goods as quickly as possible, knowing otherwise, I would have been there for hours staring at the 25 foot tall wall of cheese wheels. I loved Chick Pea Pie's Flickr photo and caption, as I was tempted to do exactly the same thing!!

Monday, October 20, 2008

Killer Treats to Tempt the Dead


For all of you anxious eaters waiting to fork some more of our Forkable food, I am excited to announce our November food event. The Aloft Loft, Chicago’s premiere center for aerial circus and physical performance, has invited Forkable to create some killer treats to raise the undead at their Homecoming Dance of Death, an aerial extravaganza, on November 1st. Check out their blog for more info on this and other upcoming Aloft events and news.

I hope you all can make it so I can knock you dead!

Sunday, October 19, 2008

Amazing Advances in Food Science


McDonalds 100% Beef uploaded by Flickr user Chrismar

In the past year McDonalds, after spending 18 budrillion dollars in food science research, was able to beat all fast food foes down to the ground with their stunningly convincing bread,cheese, tomatoes, lettuce and onions made completely of 100% beef to accompany their meat patties in all their sandwiches. Wow, what will they think of next!

Saturday, October 18, 2008

Żubrówka: A Sippable Steal


My antique decanter next to the bottle of Żubrówka

My Mom and Dad gave me this awesome decanter set for my birthday last year and so far I haven't put anything in it yet. It comes with a sweet set of shot sizes glasses, so I was thinking some sort of sipping liquor like a nice cognac. Recently I was Archies, our neighborhood bar, I was reminded of a forgotten favorite, Żubrówka. Żubrówka, pronounced zu-bruv-ka, a Polish buffalo grass Vodka, has subtle flavors of vanilla and coconut, with each bottle stuffed with one blade of its signature buffalo grass.


Blade of Buffalo grass visible behind the awesome Bison Brand logo.

I'm not much one for sipping vodka, as I am much more of a whiskey girl myself, but Żubrówka goes down surprisingly smooth and steady for such a strong liquor. Żubrówka also goes great with apple juice, a drink referred to as a Polish Kiss in the US and a frisky buffalo in the UK. Żubrówka is a sipable steal at around $13 for a fifth and $25 for a handle. If you think about a vodka you can stand to drinks straight, most cost around $20 a bottle. What a deal!

Today when I was doing my shopping for dinner, I saw one bottle of Bison Brand,my favorite brand of Żubrówka left, so I bought it up QUICK! I decided it was the perfect choice for my new decanter.


So finally after more then a year, I pulled the decanter off the shelf, washed it down and filled 'er up.


Now she's standing pretty as the center piece of our vintage hutch ready to place a Polish Kiss on our next visitor.